
Why choosing the wrong 'Grey Blending' costs you double (And how we fixed it)

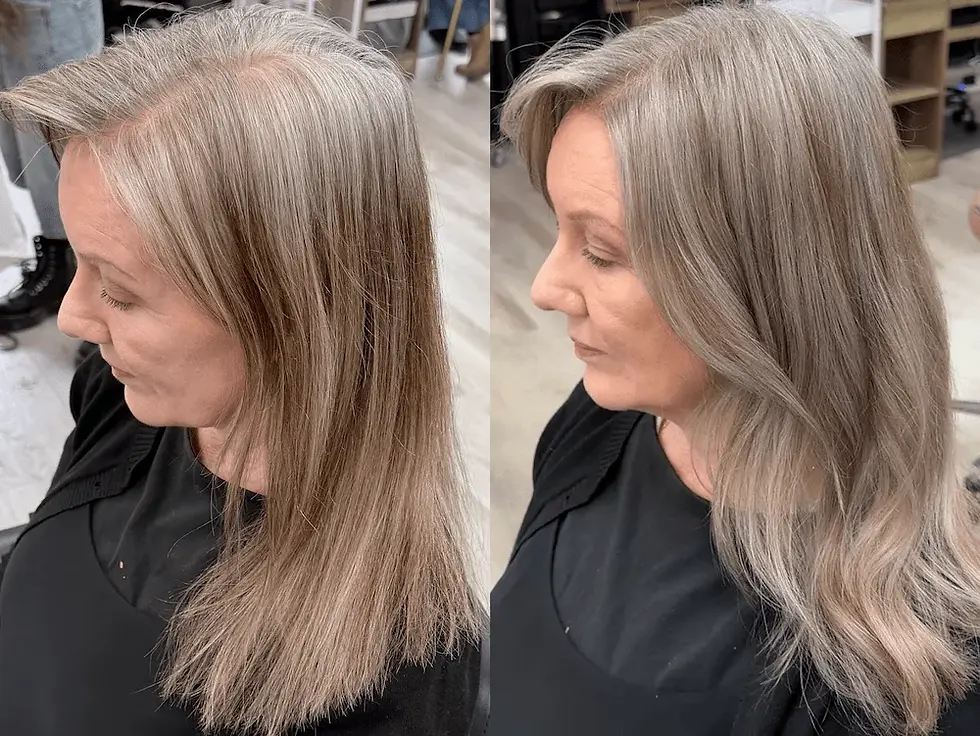
If you’ve been trapped in that frustrating cycle of covering your roots, or worse, if you’ve already tried "grey blending" elsewhere but walked out with patchy streaks, a harsh demarcation line, and compromised hair quality- this transformation is for you. I`m Sunny, Melbourne grey hair specialist. This case study is showcase how I completely corrected an incomplete blend, removed heavy dark pigment, and finally gave her the seamless, low-maintenance silver transition she deserved from the start.
How I Did It: Step-by-Step
✨ 1. The Corrective Consultation

When you’ve already been let down by a previous service, Its heartbroken, hair is damage, and its tramatise and hard to trust anyone. I feel you, that`s why consultation is important,
This is what I do in consultation:
To fully understand what happened in history, analyze where the previous blending failed.
Identify how stubborn pigment buildup and map out the demarcation lines we need to break.
Strands checked for hair's integrity, bleach test to find the best gentle formula.
I take time to hear you, to process, and use the easiest way to explain to you the situation and solution. For me, it is important to let you understand, because you will know what to expect, the result, and aftercare. Only when you understand it, will you naturally know if you are ready for it. We created a proper, honest roadmap to give her back her authentic confidence.
🧪 2. Clearing the Damaged Canvas (Colour Removal)
To fix the patchy results and clear out that stubborn, dark lowlight buildup through the mid-lengths, I used a gentle color removal technique. As you can see in image 5, this safely lifted out the old, messy pigments to reveal a clean, uniform warm canvas without snapping the hair.
🎨 3. High-Density Micro-Foil Balancing

This is where the magic (and true expertise) happens. To erase that stubborn demarcation line, I placed a high volume of ultra-fine micro-highlights, seamlessly weaving them right up to her natural silver roots. To add depth without any future pigment buildup, I paired it with soft, low-commitment lowlights.
🪞 4. Luminous Demi-Permanent Gloss
No permanent color touches your roots here. I formulated a premium, high-shine demi-permanent gloss to softly blur the transition zone and blanket the ends in a sophisticated silver-beige tone. It ensures a flawless, transparent grow-out with zero harsh lines.
✂️ 5. Structural Sassoon Cut


To complete the correction, I executed a precision structural haircut based on my Sassoon training. By removing the weathered, damaged tips and creating a soft, internal texture, we gave the hair a clean, intentional silhouette that moves beautifully.
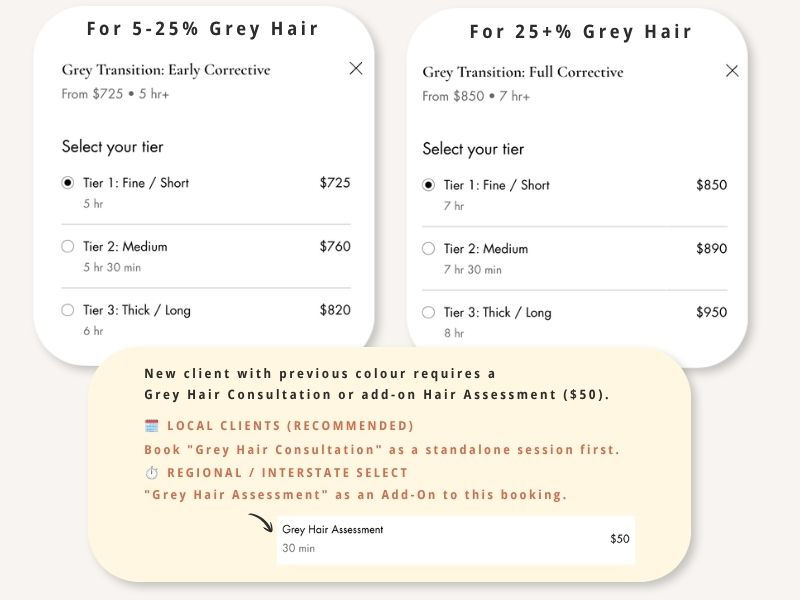
🏷️ The Investment
Corrective work requires precision, patience, and high-end technical execution to protect your hair.
Grey Transition Price List


Comments